Seven weeks after Argentine troops landed on the Falkland Islands to claim them as the Malvinas, British forces took the first steps towards reclaiming the islands.
Friday 21 May was an intense, confusing and bloody day, and the British lost dozens of men, but by the end of it all objectives had been achieved and a foothold had been established on East Falkland.
The assault had begun in the middle of the night when two teams of Special Forces were landed on either side of the northern end of Falkland Sound to remove threats to the landings.
One was dropped by helicopters from HMS Antrim near an Argentine military post 800ft high on Fanning Head, which had a commanding view of the entrance to San Carlos Water and posed a significant threat to ships and landing craft as they made their way to the landing beaches.
Further south, the second squad was flown by helicopter to tackle Argentine troops in the Darwin and Goose Green area, covered by gunfire from Type 21 frigate HMS Ardent in Grantham Sound, preventing them from moving north to confront landing forces at San Carlos.
As these two groups silently took up their positions the main amphibious flotilla ghosted into Falkland Sound and towards the entrance to San Carlos Water.
The two assault ships, HMS Fearless and HMS Intrepid, began to flood their docks and float out the landing craft that would ferry troops ashore.
Further ships, including the huge white troopship Canberra, slid into the Sound in a second wave, still without attracting the attention of Argentine lookouts., and made their way to their allotted positions.
Just before 0400 destroyer HMS Antrim opened fire with her 4.5in gun, putting hundreds of shells into the Fanning Head lookout post, and when she was finished the Special Forces teas moved in to secure the site.
Over at Darwin, the second Special Forces team put up such a show of firepower the Argentine defenders greatly overestimated the size of the force they were facing.
As this was happening, the first British troops went ashore at San Carlos (Blue Beach) – 2 Para and 40 Cdo RM took with them two pairs of Scimitar and Scorpion light tanks, but their covering fire was not required as the landings were unopposed.
The paratroopers swiftly headed south to the Sussex Mountains, five miles distant, while the Royal Marines positioned themselves at the foot of the Verde Mountains to the east of San Carlos Water.
Around daybreak the landing craft returned to ships waiting in Falkland Sound for the second wave of troops, mainly 45 Cdo RM and 3 Para.
This time the Royals went ashore at Ajax Bay (Red Beach), site of an abandoned meat-packing plant on the western shore of San Carlos Water, while the Paras landed at Port San Carlos (Green Beach), north of the Verde Mountains.
With all three landing beaches secured the Landing Ships Logistic of the Knights of the Round Table Class moved in towards San Carlos while the bigger ships, including Fearless, Intrepid, RFA Stromness and Canberra – remaining at the mouth of the inlet in deeper water.
With escorting warships patrolling in Falkland Sound, the priority was to get anti-aircraft batteries established onshore, and within a few hours a dozen sites were set up around the beachhead, along with artillery and a brigade maintenance area.
At this point the British suffered their first casualties of the day.
A Sea King had been fired on by a small group of Argentine soldiers falling back from Port San Carlos; the Sea King escaped damage but two escorting Gazelle helicopters of 3 Commando Brigade Air Squadron were hit by heavy machine gun fire within minutes of each other and three of the aircrew were killed in the crashes.
The three men were:
Sgt Andy Evans RM
Lt Ken Francis RM
L/Cpl Brett Giffin
By that time Argentina had also suffered its first aircraft losses of the day; a Chinook and one, possibly two Pumas were destroyed on the ground near Mount Kent by cannon fire from two RAF Harriers, which had only arrived in theatre there days earlier.
A third Harrier, on a photoreconnaissance mission on the west coast of Falkland Sound, was brought down by anti-aircraft fire mid-morning but the RAF pilot ejected safely and was taken prisoner by the Argentines.
At around the same time a Pucara ground-attack aircraft based at Goose Green was shot down over the Sussex Mountains by a Stinger missile fired by the SAS squad returning from their night raid on Darwin and Goose Green.
The first ship to be damaged on 21 May was HMS Argonaut, which was raked by cannon and rocket fire from an Argentine Aermacchi MB-339 light attack jet based at Stanley airfield which was on a reconnaissance flight; three sailors were injured but damage (to the frigate’s radar) was minor.
The first major air raid of the day came around 1030, with a formation of eight Dagger fighters based at Rio Grande in Argentina. One of the jets was shot down, either by HMS Broadsword’s Seawolf system, or a Sea Cat from HMS Plymouth, but HMS Broadsword was struck by cannon fire, injuring more than a dozen men and damaging the ship’s Lynx helicopters.
The third Dagger released a bomb that flew into destroyer HMS Antrim’s Seaslug magazine, glancing off two missiles before coming to rest in the heads nearby. Several fires had been started, so Antrim began to move closer to the other escorts for protection.
She was struck again by cannon fire shortly after, starting more fires and injuring more sailors, and that was effectively the end of Antrim’s participation on 21 May; she moved in towards the more sheltered San Carlos Water while the bomb was removed through a hole cut in the flight deck, and then lowered into the sea.
She then sailed out to join the carrier group out at sea, leaving Type 22 frigate HMS Brilliant to direct the Sea Harriers.
At around midday three Sea Harriers of 801 Naval Air Squadron on patrol caught a pair of Pucaras from Goose Green which were attacking a naval gunfire observation post, and one of the Pucaras was shot down by cannon fire.
The second wave of mainland-based aircraft – six Skyhawks – attacked the warships around 1300.
One of the two leading jets narrowly missed frigate HMS Ardent with two bombs then turned for home, followed by a pair of Sea Harriers from 800 NAS, which broke off the pursuit to tackle the four remaining incoming Skyhawks.
The Argentine aircraft attempted to escape, but two were destroyed by Sidewinder air-to-air missiles.
The afternoon raids continues with six more Skyhawks concentrating on Argonaut; after several near-misses two bombs struck the frigate and although they failed to explode they killed two members of the ship’s company.
The two men were:
Ab Ian Boldy
AB Matthew Stuart
The ship’s controls were damaged in the attack, and she was only stopped from running hard into the rocky shore by S/Lt Peter Morgan, who raced off with two ratings and let go the frigate’s anchor, bringing her to a halt just short of the rocks.
Soon after she was left without power, but HMS Plymouth took her in tow and left her in a more sheltered spot off San Carlos Water, where she remained for around a week until the bombs could be removed and damage repaired.
Another wave of jets now moved in to attack the British ships.
Two aborted their bombing runs, and one was shot down by a Sidewinder missile from a Sea Harrier of 800 NAS, guided in by HMS Brilliant, but the remaining three attacked frigate HMS Ardent from astern, hitting her with up to three bombs, two of which exploded but smashed through a machinery space.
Several sailors were killed and her Lynx helicopter and Sea Cat missile system destroyed, so the frigate, by now on fire and flooding, moved off to the mouth of San Carlos Water under the protection of the other escorting warships.
The next onslaught saw Brilliant raked with cannon fire, injuring some sailors, but the frigate spotted a second wave of three jets approaching over West Falkland and guided in two Sea Harriers of 801 NAS, which brought down all three Argentine planes with Sidewinders.
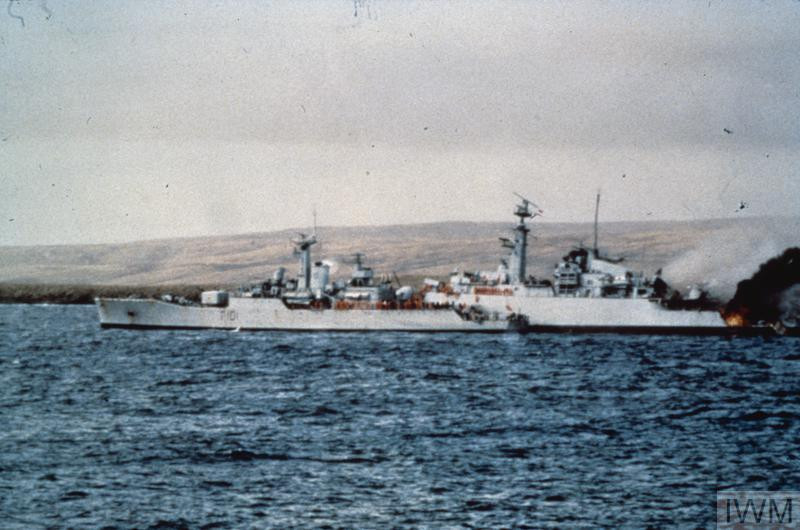
Within half-an-hour the final attack of the day was carried out by two flights of three Skyhawks, and the first three put paid to the badly-damaged Ardent.
She was hit by up to seven bombs, killing more men and almost lifting the ship out of the water. The inevitable order was given to abandon ship, as HMS Yarmouth went alongside to pick up almost 150 survivors.
22 sailors in HMS Ardent died in the attacks, and around 30 were injured. The men who died were:
AB Derek Armstrong
Lt Cdr Richard Banfield
AB Andrew Barr
EM Peter Brouard
Ck Richard Dunkerley
A/LCk Michael Foote
MEM Stephen Ford
A/Std Shaun Hanson
AB Sean Hayward
WEM Stephen Heyes
WEM Simon Lawson
MEM Alistair Leighton
AEM Allan McAulay
A/LS Michael Mullen
Lt Brian Murphy
LPTI Gary Nelson
A/POWEM Andrew Palmer
Ck John Roberts
Lt Cdr John Sephton
A/LMEM Stephen White
A/LMEM Garry Whitford
MEM Gilbert Williams
None of the three attacking aircraft returned home; one was shot down by a Sidewinder from one of a pair of Sea Harriers from 800 NAS, a second fell to cannon fire from the jump jets, and the third was too badly damaged to land at Stanley so the pilot ejected.
A final trio of Skyhawks failed to hit any ships before they streaked west to their home base.
As the air attacks were under way efforts were redoubled to shift as much by way of stores and ammunition ashore as was possible so that the supply ships and merchantmen could leave the confined waters of the Sound and return to the relative safety of the Carrier battle Group far out to the east of the Falklands.
42 Cdo RM were ferried ashore from Canberra to Port San Carlos in support of 3 Para while a medical team went ashore at Ajax Bay to set up a field dressing station under Surg Cdr Rick Jolly, and although there was still a good deal of stores on the auxiliaries and STUFT (Ships Taken Up From Trade) they sailed away as planned at the end of the day.
The first day of the Battle of San Carlos ended with both sides licking their considerable wounds.
Out in ‘Bomb Alley’ the Royal Navy had lost one ship – Ardent, which would sink the following day – while two more were badly damaged and essentially out of action, with a further two damaged; three aircraft had been lost on the day, including a Harrier.
Fortunately, the Argentine pilots had chosen to take on well-defended warships that day, rather than lightly-defended, vulnerable and packed merchant ships, including the bright white Canberra, that stuck out like a sore thumb in the midst of the grey warships and auxiliaries.
The Argentines, meanwhile, had lost 14 fixed-wing aircraft and possibly three helicopters.
With nightfall came relief from air attacks, and a chance for the Royal Navy to reassess the positioning of its ships – more attacks were certain, particularly with Argentina’s national Day – 25 May – fast approaching.
Today’s image from the Imperial War Museum collection shows HMS Yarmouth taking survivors off the crippled frigate HMS Ardent (© IWM FKD 2104)
* These posts can only give a brief sense of what was a complex and fast-moving situation 40 years ago, and cannot cover the involvement of every ship, squadron and unit in detail – for a much more comprehensive account see the Falklands section of naval-history.net at https://www.naval-history.net/NAVAL1982FALKLANDS.htm