Tuesday 8 June 1982 saw the last concerted air attacks during the Falklands Conflict by Argentine planes, and although the day ended with almost 60 British fighting men dead, three vessels burned out or sunk and one more damaged, it was too far down the line for the advance on Stanley to be halted.
The day started with Type 42 destroyer HMS Cardiff and Type 12 frigate HMS Yarmouth flinging shells ashore at Argentine 155mm guns, which had been deployed as a rudimentary coastal defence system.
Around mid-morning local time a Harrier GR3 of 1 Sqn RAF lost power as it came in to land at the new temporary landing strip at Port San Carlos, hitting the landing area heavily and skidding off.
The mishap caused sufficient damage for the facility to be closed for repairs for about three hours, leaving a crucial gap in British air defences over East Falkland at a time when ships and men were moving into positions little more than a dozen miles from the islands’ capital, Stanley.
Flagship HMS Hermes had earlier been moved further east to undertake essential maintenance on her boilers, and the loss of the Port San Carlos airfield meant the Combat Air Patrols by Sea Harriers would once more have to cover hundreds of miles to reach their allotted zones, increasing time taken to react and reducing time spent in combat.
By this time Landing Ship Logistic (LSL) RFA Sir Galahad had reached the Port Pleasant area on the southern coast of East Falkland.
She had sailed from San Carlos Water the evening before carrying the remainder of the Welsh Guards from HMS Fearless – the big assault ship had ferried the Guards round Lafonia in the early hours of Monday 7 June but there had been insufficient landing craft available to get them all ashore at Fitzroy, so Fearless had disembarked as many of the Guards battalion as could be carried in two of her own Landing Craft Utility (LCUs) but returned to San Carlos Water with the remainder.
Already at Fitzroy was RFA Sir Tristram, which had sailed in the day before loaded with stores and ammunition, and again the lack of suitable small craft had slowed down the unloading process.
To make matters worse, Argentine observers had seen the two LSLs – they could hardly miss them in the clear conditions as the ships lay close inshore near Bluff Cove – and reported their position back to their commanders.
By early afternoon more than a dozen Argentine aircraft were barrelling in across the Atlantic – eight Skyhawks and six Daggers, although technical problems reduced the force to five of each as they approached the Falklands.
The Daggers took a circuitous route which brought them into Falkland Sound, where they spotted Type-12 frigate HMS Plymouth leaving San Carlos Water on her way to bombard enemy observation posts on West Falkland.
All five attacked the warship, dropping bombs and raking her with gunfire; the bombs failed to detonate although one ripped through Plymouth’s funnel and another set off a depth charge.
Two sailors were seriously injured but no one was killed, and the fires that had been started were doused within an hour.
Members of Fleet Clearance Diving Team 1 later made two unexploded bombs safe in Plymouth’s mortar magazine and removed damaged and unstable Seacat missiles from her launchers.
The Skyhawks had made directly for Port Pleasant, spotting the two LSLs anchored a quarter of a mile apart.
The two auxiliaries were pretty much defenceless, and were caught at a crucial time, as the Welsh Guards had not yet disembarked from Sir Galahad and much stores and ammunition remained aboard Sir Tristram.
Sir Galahad was hit by up to three bombs and Sir Tristram by at least one, with another detonating close to her stern and wrecking her ramp.
Both ships quickly caught fire and Sir Galahad was ordered to be abandoned as ammunition started to explode in the flames.
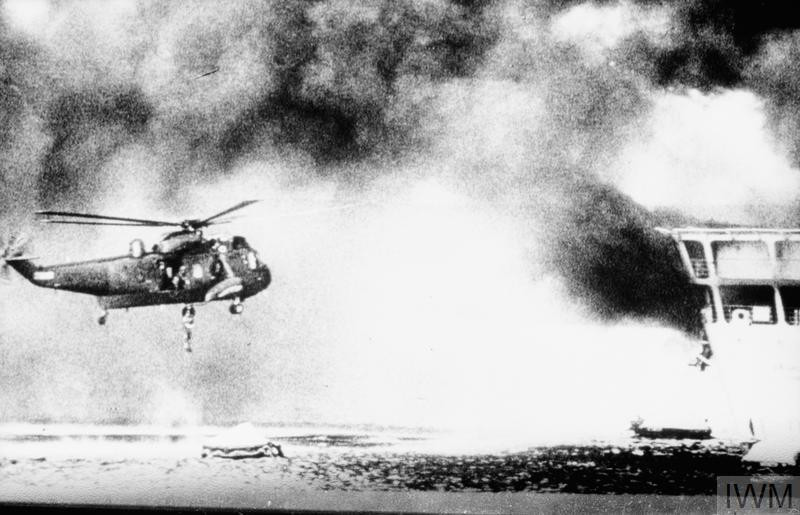
Five helicopters – four Sea Kings and a Wessex – and several smaller craft, including lifeboats and a Mexeflote, worked tirelessly in thick smoke to evacuate the uninjured Welsh Guards from the fiercely-burning landing ship, a process organised mainly by the ship’s Royal Marines detachment that took little more than half an hour, though it took a further half-hour to pluck the badly-wounded to safety from the burning ship.
Film of the helicopters hovering just above the flames, risking being caught in the blast if the ships exploded, became another iconic image of the Conflict when broadcast on news programmes back in the UK.
A total of 48 men died in RFA Sir Galahad; five from the Royal Fleet Auxiliary and 43 Army, either 1st Battalion Welsh Guards or from other Army units attached to the formation. More than 100 were injured, many suffering horrific burns.
The RFA victims were:
3rd Engineering Officer Christopher Hailwood
2nd Engineering Officer Paul Henry
Electrical Fitter Chau Dis Leung
3rd Engineering Officer Andrew Morris
Butcher Yuk Fai Dis Sung
The crew of Sir Tristram fought the flames on their ship for some time, but she too eventually had to be abandoned.
Two men died in the attack (Seaman Swi Kami Yeung and Bosun Sik Chee Yu) which was responsible for the largest number of British deaths in a single incident during the South Atlantic conflict.
With the fire confined to the crew’s quarters in Sir Tristram, leaving the engines and ammunition onboard intact, she was later patched up and sent back to the UK on a heavy-lift ship for major repairs and a refit, but the burned-out hulk of Sir Galahad could not be saved and she was later towed out to sea and sunk.
That was not the end of the carnage on 8 June.
Further waves of Mirages and Skyhawks swept in looking for targets; the latter attacked troop positions at Fitzroy but did little damage while losing two of their own aircraft, but another group of four skirting the south coast of East Falkland came upon a Landing Craft Utility (LCU) – F4 or Foxtrot Four – from HMS Fearless which had been transporting vehicles from Darwin to Fitzroy.
The vessel was hit by a bomb off the entrance to Choiseul Sound, killing five men on board, and it sank some hours later. A sixth man died later of his injuries, but 11 men survived, though some were badly burned.
The six were:
Mne Robert Griffin RM
MEA Alexander James
C/Sgt Brian Johnston QGM RM
LMEM David Miller
Sgt Ronald Rotheram RM
Mne Anthony Rundle RM
The Argentine attackers paid a heavy price, as a pair of Sea Harriers swooped to shoot down at least three of the quartet with air-to-air Sidewinder missiles.
F4 was one of eight landing craft of 4 Assault Squadron RM based on HMS Fearless, and her crew had already distinguished themselves in the Conflict – when Type 21 frigate HMS Antelope was bombed in San Carlos Water on 23 May, F4 ignored orders to keep clear and went alongside the burning ship, taking off more than 100 sailors.
Coxswain C/Sgt Brian Johnston was awarded the Queen’s Gallantry Medal for his actions that day, but he never lived to collect his award.
The attacks delayed the final assault on Stanley by possibly two days, but the drop in morale expected by Argentine commanders never happened.
Argentine aircraft also attacked a non-combatant merchant ship on 8 June, bombing and firing rockets the Liberian-registered American-chartered 200,00-ton supertanker Hercules hundreds of miles to the north of the islands.
None of the bombs exploded and she was in ballast with no oil on board, but she was forced to limp into Rio de Janeiro and her owners later scuttled her, along with the unexploded bombs, 200 miles out to sea.
Ships were still sailing from the UK on 8 June, with Astronomer being the latest to head south – the roll-on, roll-off container ship was taken up from trade by the MOD and refitted to act as an aircraft transport.
After the Falklands Conflict the ship was chartered by the MOD and a full conversion carried out, after which she was commissioned as the Royal Fleet Auxiliary helicopter support ship Reliant.
Ammunition ship Laertes also started her passage south from the UK.
Further south, the final two RAF Harrier GR3s flew direct to flagship HMS Hermes from Ascension Island.
Today’s image from the Imperial War Museum collection shows a Sea King of 825 NAS hovering at the stern of RFA Sir Galahad, winching a survivor up from a liferaft (© IWM FKD 2324)
* These posts can only give a brief sense of what was a complex and fast-moving situation 40 years ago, and cannot cover the involvement of every ship, squadron and unit in detail – for a much more comprehensive account see the Falklands section of naval-history.net at https://www.naval-history.net/NAVAL1982FALKLANDS.htm