The ‘Mighty Hood’ was the largest warship in the world when she was launched on the Clyde by John Brown Ltd in 1918.
Indeed, at more than 47,000 tons and 262m in length, Hood still retained her iconic status as the clouds of war gathered some 20 years later.
Technically classed as a battlecruiser she was also regarded as a fast battleship, capable of 30 knots in her prime, and she was the face of the Royal Navy in the inter-war period, flying the flag for her home country around the world on prestigious deployments as well as attracting massive crowds when she made port visits in the UK.
She had already had a busy war by May 1941, seeing action in the Mediterranean and patrolling the North Atlantic to protect convoy routes, at which point she was tasked – along with the brand-new battleship HMS Prince of Wales – to intercept German warships Bismarck and Prinz Eugen.
At that stage of the war the presence of large, fast, powerful enemy warships in the Atlantic was a major headache for Allied commanders – such ships could easily outpace merchant ships, attack from a distance and would be a match for almost any convoy escort that was present.
The very thought that there might be such ships in an area could mean a convoy being rerouted, or extra resources being tied up in protecting the merchantmen, even if that threat proved to be false.
Thus the Royal Navy ships, with a screen of destroyers to protect them, prepared to face up to the Germans – but despite the statistics, in reality the clash was something of a mismatch
Hood was by then something of a tired, outdated veteran, overdue a major refit which would have strengthened her deck armour amongst other work; war duties had put that work, scheduled for 1939, on hold.
She had also been overtaken technically by ships such as the Prince of Wales, which was smaller than Hood but far more advanced. However, Prince of Wales was a very new ship, which inevitably meant teething problems and breakdowns – she was so recently out of build that she had only been accepted into the Fleet the day before she deployed with Hood, and had almost 100 shipyard workers on board as she left who were trying to sort out problems with her main armament.
As the British capital ships steamed north-west, heavy seas hampered the destroyer screen, which gradually fell more than 50 miles behind the bigger ships as they sailed through the Denmark Strait.
The two forces came into contact some 300 miles off the coast of Iceland just after dawn on 24 May, and closed around 14 miles, at which point Prinz Eugen opened fire, her second salvo hitting Hood’s 4in ready-use ammunition locker at the foot of her mainmast, killing a number of sailors.
At some point Hood is thought to have switched the aim of her eight 15in guns, housed in four twin turrets, from Prinz Eugen to Bismarck, having confused the two ships in the low light.
But at 6.01am, before the British ship could fully join the battle, a salvo from Bismarck, more than nine miles distant, smashed down through Hood’s deck armour and detonated around 100 tons of explosives in a magazine.
The ship juddered violently, throwing people off their feet, and a sheet of flame erupted from below deck.
Hood instantly listed to starboard, then swung back upright, her steering gear shattered. But almost immediately she lurched back to starboard again, her back broken, and kept on rolling.
Hood’s bow reared up vertically surrounded by a blazing oil slick then sank below the waves, leaving just three of her ship’s company of 1,418 bobbing in the water amongst the wreckage – the Mighty Hood had been destroyed in less than three minutes.
Prince of Wales continued to duel with the Germans, while heavy cruisers HMS Norfolk and Suffolk, which had been shadowing the German force since the previous day, also steamed furiously to join the fray.
The three survivors, who had scrambled onto a raft, were picked up more than three hours later by destroyer HMS Electra, part of the escort force.
Prince of Wales was forced to leave the action as she had been damaged and suffered further mechanical problems, but crucially Bismarck had also been hit, causing his fuel tanks (the German ship was referred to as male, rather than female as is usually the case) to be contaminated by seawater and putting him at risk.
It also cut short his commerce raising programme and forced him to head for occupied France for repairs – presenting the Royal Navy with an opportunity for instant revenge.
Shocked by the catastrophic loss Hood, the Admiralty was determined to hit back, so a powerful task group was rapidly assembled with a simple task – sink the Bismarck.
Accompanying heavy cruiser Prinz Eugen continued on her mission to attack Allied commercial shipping while Bismarck headed south-east, with a view to rejoining the fray after repairs, but he never made it to port.
The oil slick leaking from Bismarck left a tell-tale wake which was spotted by a Short Sunderland flying boat, and cruisers HMS Suffolk and Norfolk, along with the Prince of Wales, were guided towards the ships’ location.
So important was the counterstrike that Churchill had ordered all other warships in the vicinity to close in, while cruisers Arethusa, Birmingham and Manchester patrolled the Denmark Strait in case the German battleship attempted to retrace his route back to base.
More battleships were retasked to join the chase, as was a large part of the Home Fleet, and eventually there were two aircraft carriers, half a dozen battleships and battlecruisers, 13 heavy and light cruisers, more than 20 destroyers and several submarines hunting down Bismarck.
At one point Bismarck turned to face the three trailing ships, allowing Prinz Eugen to slip away, and the German battleship exchanged salvoes with Prince of Wales, but neither side scored a direct hit.
Turning back south, the German flagship resumed a course for France, and began to gradually pull away from his pursuers despite the damage sustained on 24 May in the Battle of the Denmark Strait.
Air attacks from carrier HMS Victorious did little damage, and Bismarck was soon far enough ahead of his pursuers that he could slow down to carry out running repairs before making exaggerated course changes to throw the British ships off the scent – and it worked, as the British cruisers lost contact.
Once again huge resources were brought in to locate the German flagship, and through good intelligence, skill, tenacity and luck Bismarck was finally brought to battle.
British code-breakers and French resistance monitoring German air movements confirmed that Bismarck was heading for France, and would soon be within the defensive screen provided by aircraft and U-boats.
But luck was on the side of the Allies – Swordfish aircraft from HMS Ark Royal spotted Bismarck during a surveillance sweep, and were able to refuel and load torpedoes before returning to attack.
Most of their torpedoes missed or did little damage except one, which wrecked one of Bismarck’s two rudders, causing the battleship to become unmanoeuvrable and only able to steer in a wide circle.
Illuminated by starshells and harried by destroyers through the night of 26-27 May, Bismarck avoided major damage until the big guns – literally – were brought to bear in the form of battleships Rodney and King George V, which closed in and their first salvoes around 0845 on 27 May.
At first Bismarck fired back, but the ship’s erratic course and heavy seas prevented her firing accurately.
Cruisers HMS Norfolk and Dorsetshire moved in closer, while shells from Rodney destroyed Bismarck’s bridge and fire control director, as well as damaging the two forward gun turrets.
Within half an hour of the first salvo the German had been silenced, and by 1000 .
By 1000 Bismarck was unrecognisable – the battleship was ablaze and listing, sailors on board trapped in burning compartments or drowning in flooded spaces.
The two British battleships had fired some 700 shells from their main guns, many at close range, but still the bombardment continued while the Germans continued to fly their ensign.
Eventually almost 3,000 shells of varying calibre were fired at Bismarck in a two-hour action, of which at least 400 struck home, but it was a combination of battle damage, scuttle charges and torpedoes from HMS Dorsetshire that finally finished off the battleship.
Bismarck had been in commission for just over nine months, and despite a fearsome reputation only took part in one operation lasting just over a week – the operation that destroyed HMS Hood.
Of Bismarck’s ship’s company of over 2,200 just 114 were picked up, mainly by Dorsetshire and destroyer HMS Maori, before the alarm was raised that a U-boat had been spotted and the rescue was abandoned.
Just as the sinking of Hood had caused despondence in Britain and celebrations in Germany, so the sinking of the talismanic battleship boosted morale for the Allies, curtailed German ambitions – and restored a measure of honour for the Royal Navy.
Bismarck’s consort, Prinz Eugen, failed to trouble any Allied convoys that spring, as engine problems forced her to head to Brest for repairs before she could fire a further shot in anger.
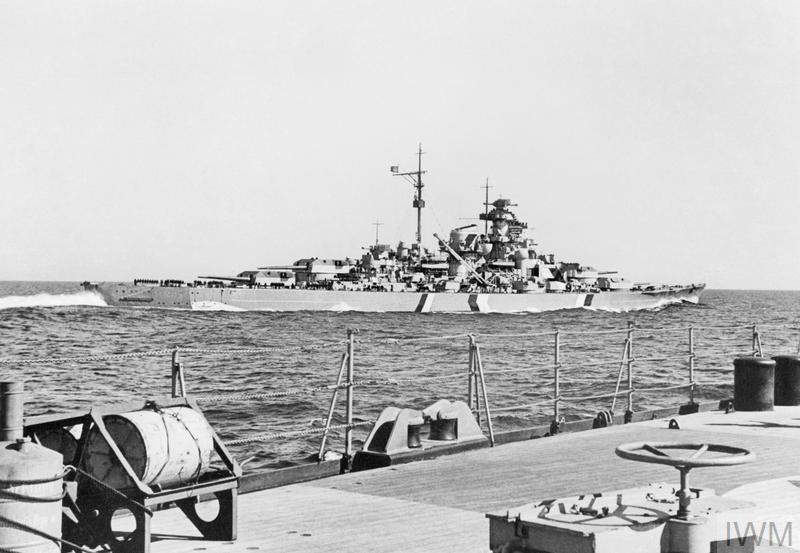
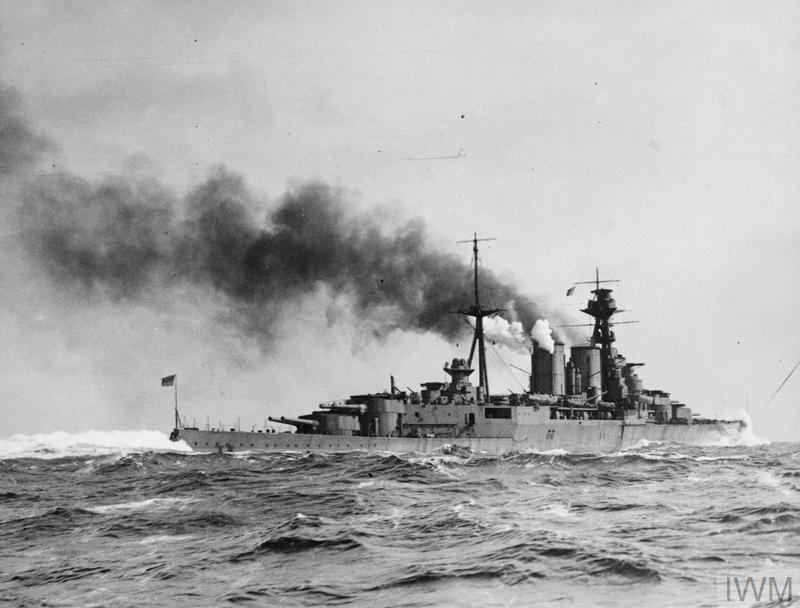
Today’s images, from the Imperial War Museum collection, show battlecruiser HMS Hood at speed in heavy seas around 1940 (© IWM HU 76081) and Bismarck, pictured from Prinz Eugen, in the North Sea in May 1941, just days before her destruction © IWM HU 374).
This series is by no means a comprehensive review of the Battle of the Atlantic, which was a colossal clash – in terms of casualties alone more than 100,000 men are thought to have died as a direct result to the battle, and more than 4,000 vessels were sunk, while many times more those numbers were involved.
Instead, we have picked out some of the more important or thought-provoking features of the campaign, and would encourage you to read further on individual aspects such as eye-witness accounts from escort ships (both fiction and non-fiction) and the role of Enigma.